

Below you will find information about configuration and use of some of the Quick.Cms.Ext's plugins.
Before reading the following instructions, make sure you read the script's manual ».
comments
After installing the plugin, edit pages you want your customers to comment on, and check the "Comments" option. To confirm the changes click the "save »" button.
Under content of the selected page, your customers will be able to add comments using the comment form.

Point to the "Page" tab, and choose choose the "Comments" link, then you will see the list of all added comments.
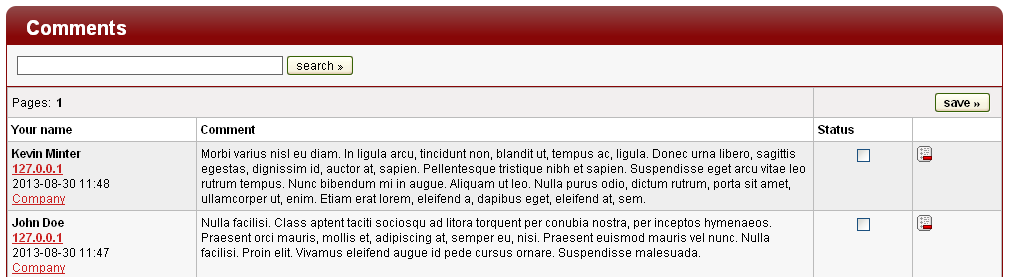
Fields in the list of comments are:
- First and last name - first and last name of the person who added the comment, his or her IP, date the comment was added and name of the page the comment was added to
- Comment - text of the comment
- Status - defines if the comment is visible for people viewing the page
- Delete - clicking the icon removes the comment

Note!
Status of new comments that haven't yet been approved by the administrator is unchecked. Every time the status of a comment is changed, the page data need to be saved by clicking the "save »" button at the top or bottom of the page.
List of recently added comments will be displayed on the main page of administration panel.
stats
The plugin creates pages, searched phrases, attached files statistics.
We recommend installing other statistics tools like Google Analytics (googleAnalytics plugin), and then disabling pages statistics in "Settings". That will make the script run faster and the database will be smaller. External statistics systems have are more efficient and more advanced.
Page statistics
Point to the "Pages" tab, and click the "Statistics" link.

Searched phrases statistics
Point to the "Pages" tab and click the "Searched phrases" link.

Downloaded files statistics
Point to the "Pages" tab and click the "Files stats" link.

Page, searched phrases and downloaded files statistics. To disable them, point to the "Tools" tab, click "Settings" and in the "Advanced" tab choose "no" in fields of elements you want to disable.

If the database is very large or you just want to clear the pages, files or any other stats, click the "clear stats" link above the list you want to clear and then confirm the action.
poll
Click the "Poll" tab in the main menu to see the list of polls. On the client-side only the poll with the highest id will be shown.

Fields in the list of polls are:
- Id - poll's id
- Question - question to which a person can answer choosing one of the options on the list
- Active - determines if a pool is visible/active
- Edit - click the icon to go to the chosen poll form

- Delete - click the icon to delete the chosen poll
The "New poll" link allows you to set up a new poll.
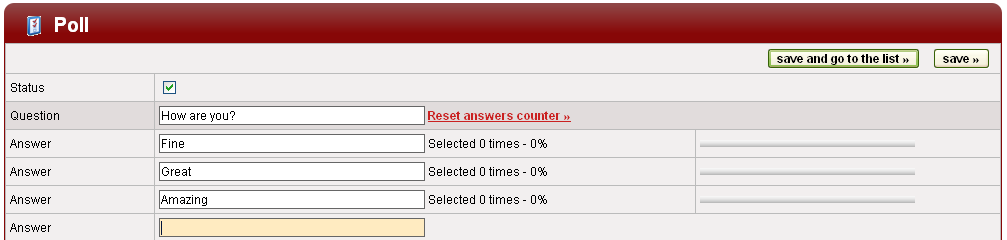
Put possible answers in the "Answer" fields; viewers visiting your website will be able to choose from them.
"Reset answers counter" link resets vote counter in this poll.
admins
After installing the plugin make sure to log out of the admin panel and continue your work only after logging in again.
Click the "Admins" link on the main menu to see the list of admins.

Fields in the list of admins are:
- Id - administrator's id
- Name - administrator's first and last name
- Login - administrator's login
- Email - administrator's email
- Last login - date and time of the administrator's last login
- Edit - click the icon to go to the edit form of the chosen administrator
- Delete - click the icon to delete the chosen administrator
Clicking the "New admin" link will allow you to add a new administrator.
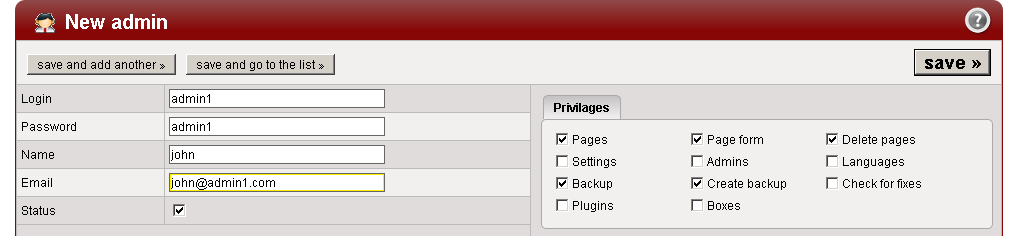
Most permissions relate to entire sections. For example if you check "Boxes" option, the admin will be able to see, edit and delete boxes. In the "Privileges" tab on the right, there are all sections, to which you can allow access to any chosen administrator. Most of the privileges refer to entire sections. For example checking the "Boxes" option will allow a chosen administrator to edit, browse as well as delete boxes.
We do not recommend giving administrators access to "Settings" (in the "Tools" tab) in order not to make the main admin's login and password available to them.
slidersBanners
You can display your sliders and banners in the left column or over the page content.
To see the list of existing sliders and banners click the "Banners" tab on the main menu.
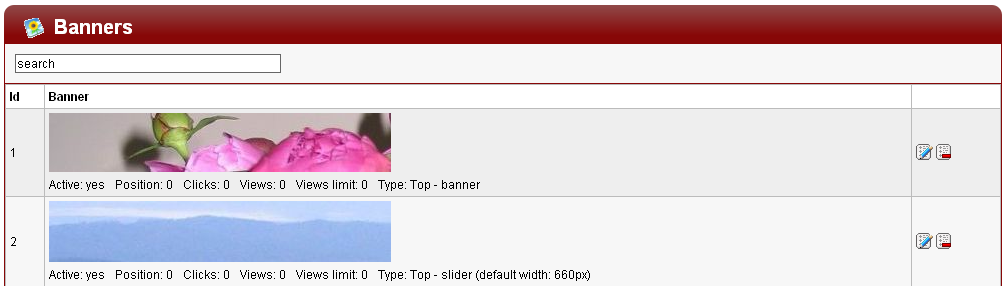
Fields in the list of banners are:
- Id - banner's id
- Banner - banner's info
- Edit - click the icon to go to the edit form of the chosen banner
- Delete - click the icon to delete the chosen banner
Click "Add banner/slider" to define a new banner or add a new image to a slider. An edit form of an already existing banner/slider is very similar.
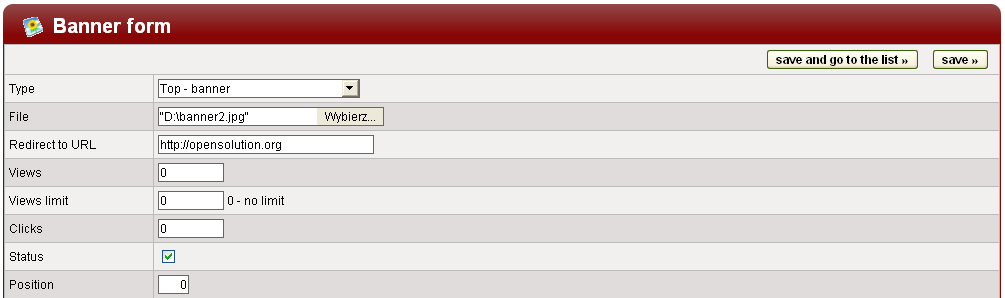
Fields in the form are:
- Type - banner or slider and its localization: left column or at the top of page content.
- File - file or image that will be displayed???.
- Redirect to URL - when one clicks the banner client-side, he or she will be redirected to the given URL address. If you don't want to redirect the person to any address, leave this field empty.
- Views - number of views of a given banner/slider.
- Views limit - for banners only - limit of views.
- Clicks - for banners only - number of clicks on a banner (if an URL address was given).
- Status - determines if the slider/banner will be displayed.
- Position - defines slider's/banner's position. Sliders/banners with smaller position are displayed before sliders/banners with larger position. Negative values are allowed.
- Description - for sliders only.
Acceptable file formats are: jpg, gif and png. Additionally for banner the swf format is allowed. When a "swf" file is added, additional fields: height, width and color of the banner must be defined.
slidersExt
Slider subpages list
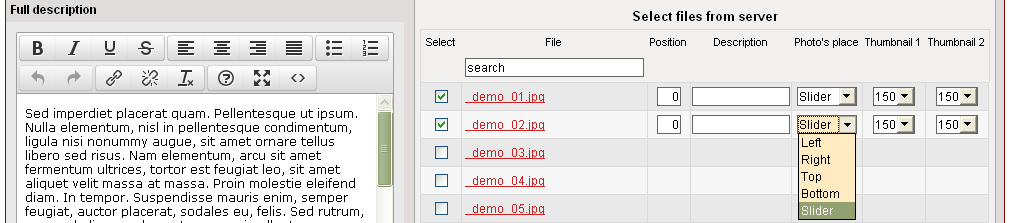
To create a slider type list of subpages of a given page, edit the parent page, point to the "Advanced" tab and choose the "slider" option in the "Subpages" field.

For each subpage of the given parent page add at least one image of the right size, e.g. 660px x 200px and choose "slider" localization for these images.

Go to parent page preview and see the list of subpages.
Slider image gallery.
Prepare images the same size. Add these images in the page form and set their localizations to "slider".
templatesEditorExt
In the "Tools" tab choose the "Templates" link. On the right side you will see the list of templates you can edit. On the left there is an edit box of the file you choose from the list.
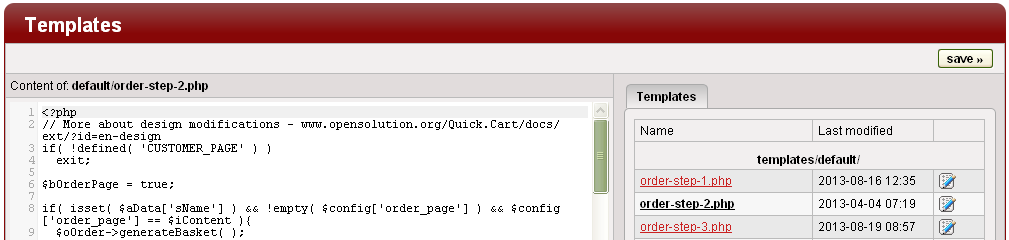
Fields in the tab on the right are:
- Name - file name
- Last modified - date and time of last modification
- Edit - click the icon to edit the chosen file in the edit field to the left
Click the "New template" link in the "Tools" tab to go to the new template form.

Note!
You can only remove templates that were added by a user and plugin templates.
You can disable the template editor. Edit the "database/config/general.php" file, find the $config['plugins']['template-editor'] variable and set its value to "false".
users
Settings:
Before using the plugin you need to add new pages to the top menu ("Top menu - above logo") and choose appropriate themes for those pages in the "Advanced" tab of the page edit form:
- login (required), theme: "page_users_login.php"
- logout (required), theme: "page_users_logout.php"
- register, theme: "page_users_profile_register.php"
- profile, theme: "page_users_profile_register.php"
- forgot your password?, theme: "page_users_password.php"
Point to the "Tools" tab and click the "Settings" link, then choose the "Pages" tab and in the "Login page" field choose the "login" page you've just created, for the "Logout page" field choose the "logout" page, etc. for all of the pages listed above.
You can require terms & conditions acceptance during registration. To be able to use this option a terms & conditions page must exist and be assigned in Setting in the "Page with regulations" field. A new user can also (while registering) sign up for the newsletter checking just one additional field. To make this option available, the newsletterLiteExt plugin must be installed.
Click the "Users" tab to see the users list.

Fields in the list of users are:
- Id - user's id
- Surname, First name - user's first and last name
- Login - user's login
- Email - user's email
- Edit - click the icon to go to a user's edit form
- Delete - click the icon to delete a chosen user
Click the "New user" link to go to an edit form to add a new user.

After filling the form (boldfaced fields are required), assign to the user one or more user groups choosing them from the list of available groups (to choose several groups, click them holding down the "ctrl" key). Notice that user groups are assigned to a specific language.
Point to the "Users" tab and click the "List groups" link to see a list of all groups.

Fields in the list of groups are:
- Id - group's id
- Name - group's name
- Edit - click the icon to go to a group's edit form
- Delete - click the icon to delete a chosen group
To add a new user group, point to the "Users" tab and click the "New users group" link.

If you want a page to be visible only to certain users, point to the page form and in the "Advanced" tab select a group (or groups - to choose several groups for one user click the group names holding down the "ctrl" key). The page is now visible to all users assigned to the group (groups) you selected and not visible to all others.

Point to the "Tools" tag and click the "Settings" link. In the "Advanced" tab you will find some new fields you can use: "Login form in column" and "Send an email whenever there is a new user".

FACEBOOK CONNECT functionality allows your users to log in to your website using their Facebook login and password. To be able to use it, first you need to create a Facebook app. After filling all the necessary data, you'll get two strings: App Id and App Secret. Put these strings as values of the $config['fbAppId'] and $config['fbAppSecret'] variables respectively in the database/config/general.php file. The last step is to write your website's address in the "Website with Facebook Login" field on the same Facebook page.
seoOptionsExt
Redirecting:
To set up addresses you want to be redirected, go to the "Tools" tab and click the "List of redirections" tab.
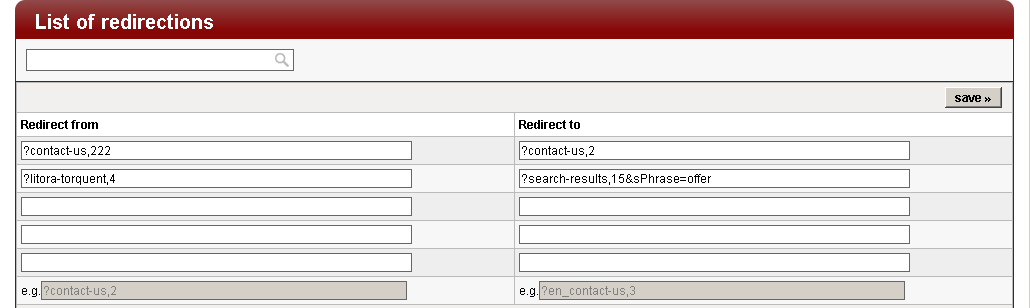
Then, as shown in the example, enter addresses from which you want users to redirected as well as respective target addresses.
To enable redirections, point to the "Tools" tab and click "Settings". Then in the "Advanced" tab, change the value of the "Enable redirections" field to "yes".
Meta robots:
Edit chosen pages and go to the "SEO" tab. Then fill in the "Meta robots" field, as in the example, and save the page.
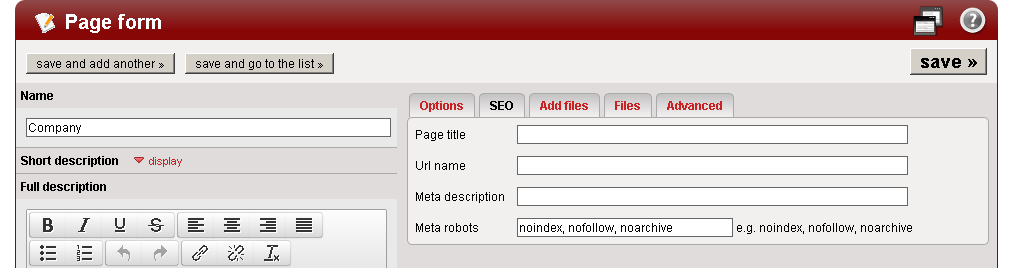
Code transferring information to robots will be added to the "Company" page.
If you want to handle the "404" error, you need to create a new page titled, for example, "404 error", and then in "Settings" in the "Pages" tab, choose this page in the "404 error page" field.
To hide all options related to redirecting, edit the "database/config/general.php" file, find the code: "$config['hide_redirect_links'] = null;", and replace it with "$config['hide_redirect_links'] = true;".
This plugin allows to redirect from an incomplete address, only the part before the "&" or "?" character is taken into account (when the seoLinksExt plugin is installed). To make it work this way, edit the "index.php" file, find the code: "redirectLink( true );" and replace it with "redirectLink( null );".