

Here you can find descriptions of all options in the administration panel.
Before you start creating your website, make sure that:
- you've read the after upload requirements (e.g. you've secured your site properly)
- you've completed the initial configuration (some of the advanced options are only accessible in the configuration files)
- you've read the user's manual - first steps
Login
To enter the administration panel, add the ‘admin.php/’ phrase to your web address, e.g.: if URL looks like: ’http://example.com/‘, the administration panel address will be:’http://example.com/admin.php‘. There you will see the login screen. For first login use the following:
Login: admin
Password: admin
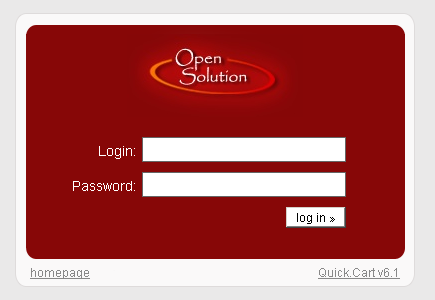
You can change it after logging on to administration. To do that, select the Settings link on the "Tools" menu.
Settings modification
You can modify all the basic data on the settings page (some of the advanced options are only accessible in the configuration files).
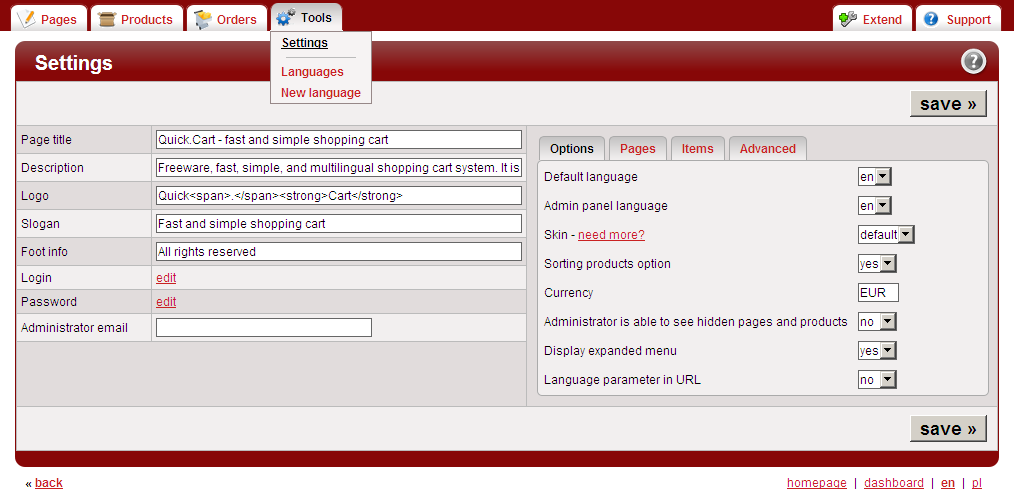
The Settings page contains the following fields:
- Page title - content of this field will be displayed on the browser’s header stripe. It is also important for searchers - it will appear as the title of your site.
- Description - this field is used mostly by searchers. It will appear as description of the site in searchers.
- Logo - text displayed as a logo. You can also put a HTML code here, that will, for example, display an image.
- Slogan - slogan, that appears under logo.
- Foot info - this information appears on the left side of the footer, it can contain e.g. information about copyrights.
- Login - login for administrator.
- Password - password for administrator.
- Administrator email - if you want to receive order information by e-mail, put you e-mail address in this field.
These are the fields with the most basic and most important information. Besides that, on the right side of the page you will find a panel with additional fields in it, which are divided into several tabs.
- Options
-
This tab contains the following fields:
- Default language - default language choice.
- Admin panel language - choice of language in which names of fields, messages, etc in the administration panel are to be displayed.
- Skin - you can choose a template/skin for your page.
- Administrator is able to see hidden pages or products - here you can decide if a logged administrator will be able to see hidden pages (on the client-side).
- Display expanded menu - here you can decide if the left menu should be extended at all times.
- Language parameter in URL - here you can decide if language code parameter should be displayed in the URL address. if you're planning on creating a multilingual website, we recommend enabling this option.
- Sorting products option - enables your clients additional product sorting by name or price
- Currency - allows you to choose currency in which the prices will be displayed.
- Pages
-
This tab contains fields:
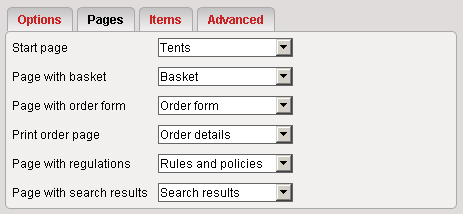
- Start page - setting a page/subpage as the main/home page (note: you should create these pages first).
- Page with basket - page/subpage, where the cart content will be displayed.
- Page with order form - page/subpage for the order form.
- Print order page - page that displays order summary and its printout.
- Page with regulations - page/subpage, where terms & conditions will be displayed.
- Page with search results - page on which search results will be displayed.
- Items
-
This tab contains fields:
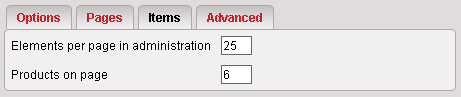
- Elements per page in administration - determines how many products per page will be displayed in the administration panel.
- Products on page - determines how many products per page will be displayed on the client’s side.
- Advanced
-
This tab contains fields:

- Change files name to page or product name - you can change the file names to be the same as the page name. For example if you have a "xyz.jpg" file and the page is named "abc", then after adding this file to "abc" page, the file name will be changed to "abc.jpg". Very useful option to recognize to which page the file is linked.
- Delete unused files from the server - here you can decide if unused files should be deleted from the server.
- WYSIWYG editor - you can decide if a WYSIWYG editor should be displayed above short and full description while adding/editing a page/product.
- Send customer order details on email - this option allows to sent a customer an email containing details of an order the customer placed.
- Display products from subcategories in parent category - determines if products assigned to a subcategory will be displayed in the parent category.
- Display the "Remember basket" button - determines if the "Remember basket" button will be visible in the basket.
Pages management
Page edit form
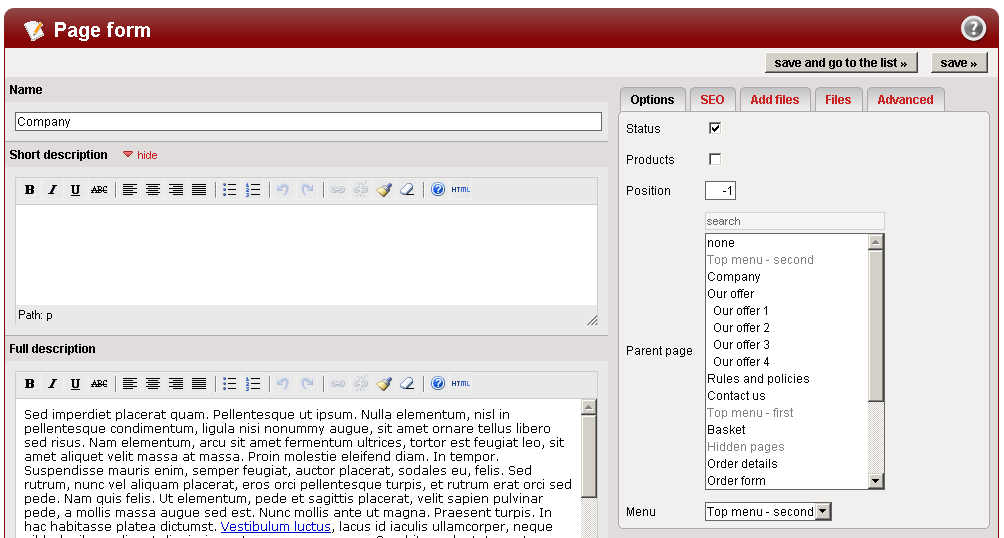
Fields on the left side of the page form are:
- Name - name of a page/subpage.
- Short description - displayed on the list of subpages. Learn more »
- Full description - displayed on the details page.
Note!
If full description is empty, short description will be used in page details.
Additional panel consists of the following tabs:
- Options
-
This tab contains fields:
- Status - allows to determine if particular page/subpage should be visible or not.
- Products - only after this option is checked, you can add products to this page and display them.
- Position - defines positions of a page on a menu, list of subpages, etc. Pages with lower position number are displayed before pages with higher position number. Negative numbers are allowed.
- Parent page - selecting a parent page will make a page into a subpage. Learn more »
- Menu - determines to which menu the page will be assigned, if a parent page was not selected.
- SEO
-
This tab contains data, that are not visible directly on a website, they are however very important for search engines. In the tab you can find the following fields:
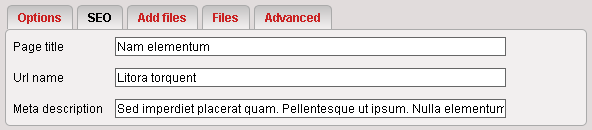
- Page title - title displayed in a browser's bar, used also by search engines.
- Url name - title displayed in a browser's address bar.
- Meta description - this field contains website's short description.
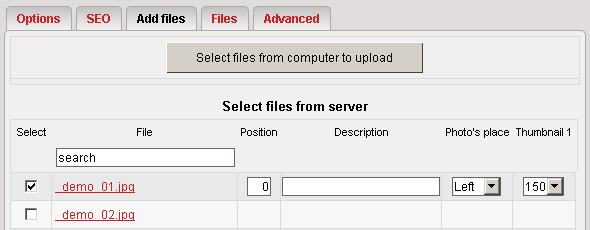
- Add files
-
In this tab you can choose files, which you want to add to your website from server or computer
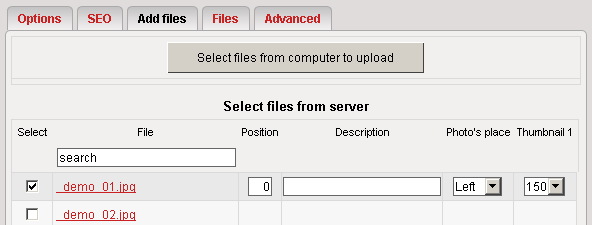
- Files from computer - allows to upload files from you computer's hard drive to a server. The files will be uploaded and automatically selected. Learn more »
- Files from server - list of files uploaded to the server (search option available). After checking a file, which you want to put on a page, additional fields will become available:
- position - order to displaying files, if there are more then one,
- description - description displayed below the file,
- localization - for images - localization where the image will be displayed (left/right),
- thumbnail 1 - for images only - length of the longer side of a thumbnail displayed in subpages list,
- thumbnail 2 - for images only - length of the longer side of a thumbnail displayed in page details. To learn hot to make this option available, go to initial configuration »
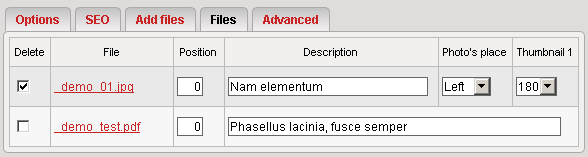
- Files
-
This tab lists all files previously attached to the page. All fields are identical to fields described above. One additional field is available:
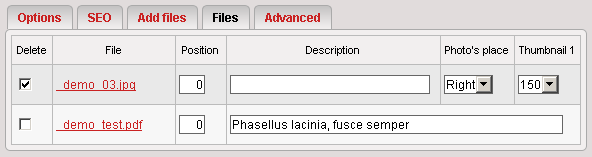
- Delete - checking this field and clicking the "save »" button will delete selected files.
Note!
If the attached file is not an image, "localization" and "thumbnail 2" fields are hidden.
- Advanced
-
This tab contains fields:
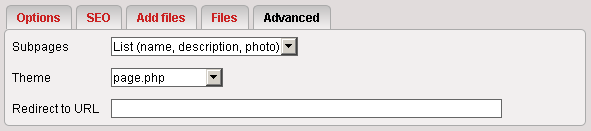
- Subpages - subpages display style for a particular page. You can select from:
- List (name) – subpages of a given page will be displayed as a list of page names.
- List (name, description) – subpages of a particular page will be displayed as a list of names with short description.
- List (name, description, image) - subpages of a particular page will be displayed as a list of names with short description and photo.
- No display - no subpages list will be displayed.
- Theme - theme file "templates/default/page.php" (default) with php extension, defines the page structure.
- Redirect to URL - entering a full web address into this field means that the visitor will be automatically redirected to the specified address.
- Subpages - subpages display style for a particular page. You can select from:
 - click to go to preview of edited page
 - saves the edited page and displays empty form to add another page
 saves the edited page and displays empty form to add another page
 - go to documentation
 - saves the edited page and redirects to list of all pages
List of pages
To see the list of all pages, click the "pages" tab on the menu, under logo. It will look like on the screenshot below.
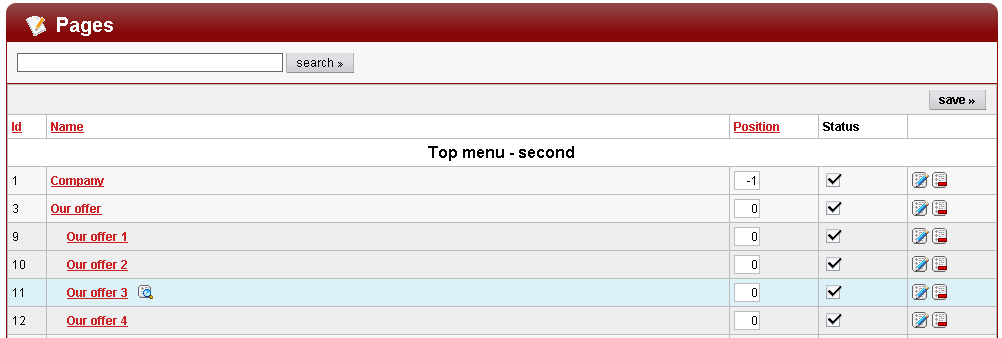
Pages in this list are grouped by menu types. For every page you can see the following information:
- Id - page id
- Name - page name
- Position - determines order by which pages are displayed. Pages are displayed in ascending order. Negative values are allowed.
- Status - if this option is checked, the page will be visible client-side.
- Edit - click the icon to go to the page edit form

- Delete - click the icon to remove the selected page, your choice must be confirmed.

- List options:
- 1. Click one of the fields: id, name, position - the list will be sorted by the chosen field.
- 2. Point to a page (in the list) to see the icon, that is a link to client-side page preview.

- 3. Search box is placed above the list.
- 4. When page status or position is changed, it is necessary to save changes by clicking the "save »" button either on top or on the bottom of the list.
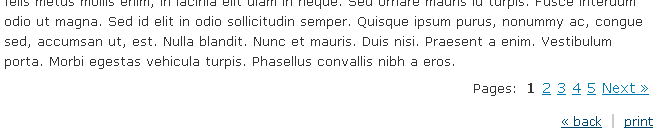
Pagination
Pagination means that page content is divided into several pages. It especially useful when a text is long.
To divide text into pages, go to the full description field, and type [break] in the place you want the text to be divided.

As a result, on the bottom of the page links are displayed in the following form:
Page preview available only for admins
The script consists of two parts: administration panel (accessible only after logging in) and the client-side part (main part of the site, visible for every visitor). To let an admin preview pages before publishing them for visitors, execute the following steps:
- In admin panel point to "Tools" and choose the ‘settings’ link. In the ‘options’ tab set ‘yes’ in the ‘Administrator is able to see hidden pages and products’ field.
- In list of pages, uncheck the ‘status’ field next to pages you don't want visitors to see and click "save »"
- In the same browser, where you are logged in to the administration, open new tab with your page (client-side). You will be able to see there also pages set as invisible. They are visible only for user logged on to the administration, other user won’t be able to see them.
If you want to make a specific page visible for every visitor, check the ‘status’ field (see paragraph 2.). Pages preview allows you to check design, layout and content of a page before it's publicly available.
Product management
Product edit form
The next very important step is adding products. The "Products" tab is responsible for that. Point to this tab and choose the "New product" link. Below you can see a new product form:
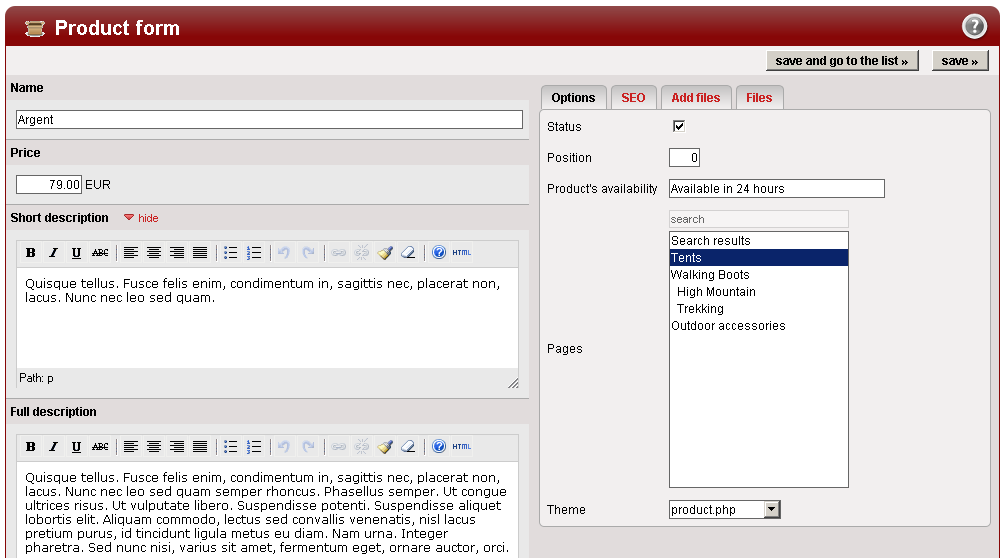
It contains the following fields:
- Name - name of the product (it will be also displayed in the title of the page containing product details).
- Price - price of the product. Numerical value or plain text are acceptable. In case of plain text, it will not be possible to place an order on this product.
- Short description - short product description displayed in the list of products on the shop site.
- Full description - full description displayed after viewing the product details.
Additional panel (on the right-hand side) consist of the following tabs:
- Options
-
This tab contains the fields:
- Status - determines whether the product is visible or hidden.
- Position - products displaying order. The product with lower position is displayed before the product with higher position. You can use negative number.
- Product availability - in this field you can determine whether the product is available or not.
- Pages - choose a page where the product will be displayed (you can choose multiple pages by clicking while holding ctrl key).
- Theme - theme file (with php extension in the "templates/" directory in the chosen skin directory) defines product page structure (default: product.php).
- SEO
-
This tab contains data, that are not visible directly on a website, they are however very important for search engines. In the tab you can find the following fields:

- Page title - title displayed in a browser's bar, used also by search engines.
- Url name - title displayed in a browser's address bar.
- Meta description - this field contains website's short description.
- Add files
-
In this tab you can choose files to add from computer or server
- Select files from your computer to upload - allows to upload files from you computer's hard drive to a server. The files will be uploaded and automatically selected. Learn more »
- Select files from server - list of files uploaded to the server (search option available). After checking a file, which you want to put on a product page, additional fields will become available:
- position - order to displaying files, if there are more then one,
- description - description displayed below the file,
- localization - for images - localization where the image will be displayed (left/right),
- thumbnail 1 - for images only - length of the longer side of a thumbnail displayed in subpages list,
- thumbnail 2 - for images only - length of the longer side of a thumbnail displayed in product details. To learn hot to make this option available, go to initial configuration »
- Files
-
This tab lists all files previously attached to the product page. All fields are identical to fields described above. One additional field is available:
- Delete - checking this field and clicking the "save »" button will delete selected files.
Note!
If the attached file is not an image, "localization" and "thumbnail 2" fields are hidden.
- Advanced
-
This tab contains the following fields:

- Theme - the theme file (with php extension, stored in the "templates/" directory in the chosen skin directory), which defines the product page structure (default product.php).
- Keywords - available since version v6.4 - field, that search engines use. Keywords are phrases related to the products.
Note!
When the product data are entered, click "save »" or "save and go to list »" on top or bottom of the page. Every time data is entered in any tab of the additional panel, it should be saved. When one adds files and photos, saving the product may take a while, because the file is being sent to the server. Wait until the process is finished, which will be indicated by an appropriate message. Avoid clicking the save button multiple times.
Products list
To see the list of all products, click the "Products" tab on the top menu under logo. Products list looks similar to what you can see on the screenshot below:
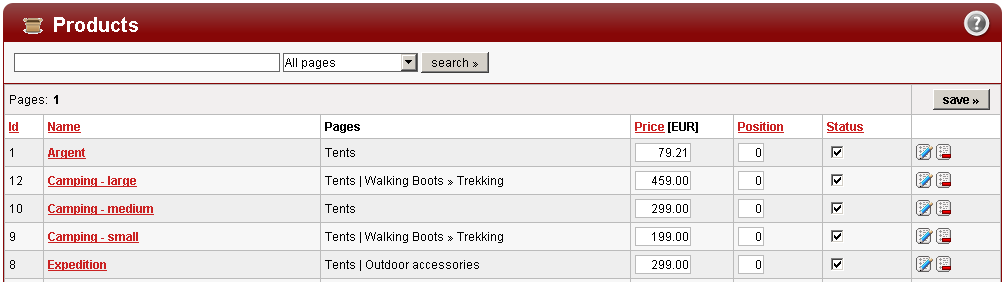
On the list the following page information is included:
- Id - product id
- Name - product name
- Pages - list of pages to which the product was assigned
- Price - price of the product
- Position - determines order by which products are displayed. Products are displayed in ascending order
- Status - if this option is checked, the product will be visible client-side.
- Edit - click the icon to go to the product edit form
- Delete - click the icon to remove the selected product, your choice must be confirmed.
- List options:
- 1. Click one of the fields: id, name, position - the list will be sorted by the chosen field.
- 2. Point to a product (in the list) to see the icon, that is a link to a client-side product preview.
- 3. Search box is placed above the list.
- 4. When product status or position is changed, it is necessary to save changes by clicking the "save »" button either on top or on the bottom of the list.
Pagination
Pagination of product page content works the same way as in case of non-product pages. Go to page content pagination, to learn more.
Product preview available for admins only
The script consists of two parts: administration panel (accessible only after logging in) and the client-side part (main part of the site, visible for every visitor). To let an admin preview products before publishing them for visitors, execute the following steps:
- In admin panel point to "Tools" and choose the ‘settings’ link. In the ‘options’ tab, set ‘yes’ in the ‘Administrator is able to see hidden pages and products’ field.
- In list of products, uncheck the ‘status’ field next to products you don't want visitors to see, and then click "save »"
- In the same browser, where you are logged in to the administration, open new tab with your website (client-side). You will be able to see products set as invisible. They are visible only for user logged on to the administration, other user won’t be able to see them.
If you want to make a specific product visible for all visitors, check the ‘status’ field (see paragraph 2). Products preview allows you to check design, layout and content of a product before it's publicly available.
Orders management
Order edit form
Order edit form is presented on the screenshot below:
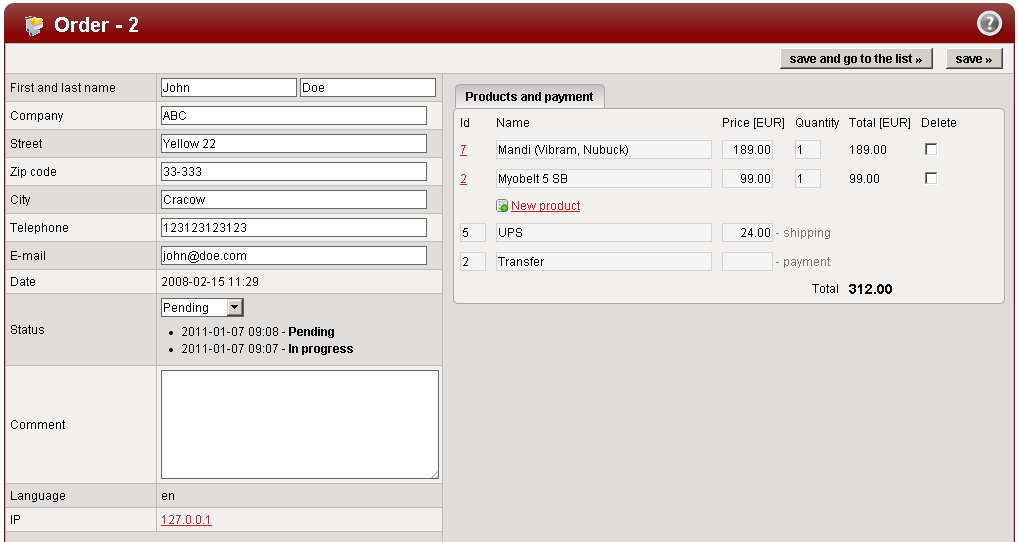
In the main panel there are the following fields:
- First and last name, Company, Street, Zip code, City, Phone number, E-mail - personal data of the customer placing the order; editable.
- Date - date the order was placed.
- Status - order status, choose from the list: pending, in progress, finished, canceled. Default status is "Pending".
- Comment - comment written by customer while placing the order; editable.
- Language - language version of the website, from which the order was placed.
- IP - ip address of the computer, from which the order was placed.
In the side panel, next to the main information panel, there is a "Products and payment" tab. With it you can:
- Edit products in an order - name, price and quantity fields are editable.
- Delete products from an order - to remove a product from an order, check the "Delete" box next to the product you want to remove, and then click "save »" or "save and go to the list »".
- Add products to the order - a "New product" link is placed below the order product list. If you click it, empty fields will be added, new product data can be entered there. Fields you must fill are: id, name, price (these data should match the product details) and quantity.
- Edit payment and shipping method - id, name and price fields are editable, so that you can change payment or shipping method details even after the order is placed by a customer.
Each operation should be ended by clicking the "save »" or "save and go to list »" buttons on top or bottom of the page.
Order list
To see the list of all orders placed in the shop, click the "Orders" tab on top menu below logo.

Its columns contain the following information:
- Id - order id number.
- First and last name, E-mail, Telephone, Company - client’s personal details.
- Date - date the order was placed.
- Status - order status.
- Edit - click the icon to go to the order edit form
- Delete - click the icon to remove the selected order, your choice must be confirmed.
Order search field is placed above the list. You can search by a phrase of filter by order status. "Search in products" option allows to search a given phrase also in products attached to the order (remember that if there are many orders, this option will significantly increase the server load).
Payments
Payment edit form

Payment edit form is very simple. It includes the following fields:
- Name - payment name (transfer, fetch, etc.)
- Status - allows to hide a payment
Note!
End every operation by clicking one of the "save »" or "save and go to the list »" buttons. You can find them on top and bottom of the page.
Payment methods list
Point to the "Orders" tab on the top menu under logo, choose the "Payments" link. You will see the list of all payments defined in the online cart.

Fields on the list of payments are:
- Id - payment id.
- Name - payment name.
- Active - payment status.
- Edit - click the icon to go to the payment edit form.
- Delete - click the icon to remove the selected payment, your choice must be confirmed.
Search field is placed above the list of payments.
Shipping
Shipping edit form
The "New shipping" link allows to define a new shipping method. Clicking it will redirect you to the form, that contains the following fields:

You need to fill the following fields on the left hand side of the form:
- Name - name of the delivery method which will be its indicator. This name will be shown on the list, when an order is being placed by a customer.
- Price - shipping price.
- Status - uncheck this option to hide the shipping method.
On the right, there is a tab you should use to check (mark) available payment methods (that has been previously added) and to define shipping price to payment method fee ratio. This ratio can be fixed in one of two ways:
- percent - for instance, declaring "10%" means, that the shipping rate will be increased by 10% when this payment method is chosen.
- value - for example, entering value "8" means, that the shipping price will increase by 8, likewise "-8" means subtracting 8 from the shipping price when this payment method is chosen by a customer.
Every operation should be ended by clicking "save »" or "save and go to the list »" button. You can find the buttons on top and bottom of the page.
Delivery methods list
Point to the "Orders" tab, and choose the "New shipping" link.

- Id shipping method id.
- Name - shipping method name.
- Active - delivery status.
- Price - shipping price.
- Payments - payments associated with the shipping method.
- Edit - click the icon to go to the delivery method edit form
- Delete - click the icon to remove the selected delivery method, your choice must be confirmed.
Languages management
To add a new language, in the admin panel, point to the "Tools" tab, and choose the "New language" link. You will see the new language form.

You are going to fill in the following information:
- Language - name for the new language, it should consist of two letters according to the ISO 639-1 standard (check in the table).
- Upload language file [Optional] - find the translations at the OpenSolution » website. To install a translation on your website, download the file to your computer, unzip it and in the admin panel, select the file with the "php" extension from your computer.
- Create language using - choose language which will be the basis for creating the a one.
- Clone data from basic language [Optional] - copies data (pages) from selected basic language.
Change back-end language
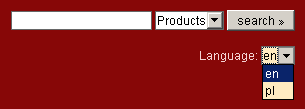
Once you choose the new language from the pull-down list in the main menu on the top right hand side, you can add new pages to that language.
Note!
Changing language in this select will change the language of data. Admin panel language will not be changed.
Change client-side language
Once new language version of administration is set, you can browse pages in the new language. To help users change between language versions of your website, add link to the language versions. To do that, edit the "templates/default/_header.php" file, find the code:
// content of left menu ?>
and replace it with:
        // content of left menu ?>
  <a href="./?sLang=pl">polski</a>
  <a href="./?sLang=en">english</a>
Some notes and advices
- In the scripts it is possible to add pages on any level, so you can add a page, a subpage, a subsubpage etc.
- Check if your server's PHP version is higher than 5.2.0. It is required for the applications to work correctly.
- Try not to add images exceeding 1600 x 1200 pixels, because server may have problems generating thumbnails for the script.
- Added photo or file shouldn’t be larger then 2 MB. It's a very popular server's limit.
- If you want the script to generate thumbnails properly, check if the gd 2.0 library is activated on your server.
- A lot of problems are caused by wrong permissions settings. Please check if you have set the correct file permissions to directories and files if:
- can't load images and files,
- can't save pages/subpages data.
For more information on this subject go to the Uploading scripts on your server » section. - It is not allowed to remove or hide "Shopping cart by Quick.Cart" link from footer of any page or subpage of a website, it constitutes a license breach.